Everything you need for successful installations.

Guides, step-by-step methods and videos: everything about the AnkrRise, in one place.

Guide

Getting started with AnkrRise

Four steps to your first pour: choose your kit, choose your adapter diameter, gather what you need on site, then assemble your AnkrRise.
OpenClose

Choose your kit

The Starter Kit includes both templates and everything else; the small and large AnkrRise are sold on their own.

Most completeStarter Kit "Two bags to do it all" AnkrRise small AnkrRise large
Anchor spacing (c/c)4–14 in and 4–27 in4–14 in4–27 in
Precision rails4 small + 5 large4 small5 large
Anchors per templateUp to 8Up to 4Up to 8
Installation brackets10 corner + 2 center4 corner6 corner + 2 center
Marking brackets (Sharpie)6 corner + 2 centerSold separatelySold separately
Formwork brackets (2x4)40 corner + 12 centerSold separatelySold separately
Anchor rod adapters96, one diameter of your choiceNot includedNot included
Assembly rods8, same diameterNot includedNot included
Formwork marking adapters8Sold separatelySold separately
AnkrPrism (hands-free)IncludedSold separatelySold separately
Price (CAD)$1,299.99$249.99$379.99
ShopShopShop

Swipe the table to compare →

Choose your adapter diameter

Adapters hold the anchor rod plumb in the bracket, 2 per bracket (one underneath, one on top). They come in 7 color-coded sizes, sold in tubes of 16 (enough for 8 brackets).

With the Starter Kit, choose your diameter when you order: you get 96 adapters and 8 assembly rods in that size. The small and large AnkrRise ship without adapters, so add a tube in your size.

The 7 diameters (in)
  • 3/4
  • 7/8
  • 1
  • 1 1/8
  • 1 1/4
  • 1 3/8
  • 1 1/2

What you need on site

  • For the AnkrRise

    Nothing else. Rails and brackets assemble by hand with the screws in the kit.

  • For 2x4 templates

    2x4s cut to the width of the formwork (2x3s for a marking template), wood screws, a drill, a tape measure and a pencil. To set it in the forms: a temporary square bracket, a string line and a level.

  • Directly in the formwork

    A 2x4 fits flush under the top rail (1.5 in clearance). Screws fix the rails through the marked spots.

  • For marking and slabs

    A fine-point Sharpie (included with marking bracket sets).

Assemble your AnkrRise

  • Small AnkrRise (4 rails)

    1. Place the 4 corner installation brackets with the adapter holes facing the center.
    2. Lay the 2 bottom rails, then the 2 top rails.
    3. Fasten the rails into the brackets with the assembly screws.
    4. Set your dimensions on the graduated rules, then tighten fully.
    5. Insert 2 adapters per bracket, one underneath and one on top.
    Watch the video 0:40
  • Large AnkrRise (5 rails, up to 8 anchors)

    1. Place 4 corner installation brackets, angled toward the center.
    2. Add 2 bottom rails.
    3. Add 2 more corner brackets, a third bottom rail, then the 2 top rails.
    4. Fasten with the 6 assembly screws.
    5. Add the 2 center brackets (with their spacer) and tighten the black handle screws.
    6. Insert the adapters.
  • Marking template

    1. Place 4 corner marking brackets, pen holes angled toward the center.
    2. Add the bottom rails, then the top rails.
    3. Set the distance and tighten the black handle screws while holding the rails in place.
    4. Lay it on the plywood and mark each hole with the Sharpie.
    Watch the video 0:41
Back to articles
Step by step

Discover all the techniques, specifications and uses

Methods, specifications and uses, explained simply. Open the topic you need.

Build a 2x4 template

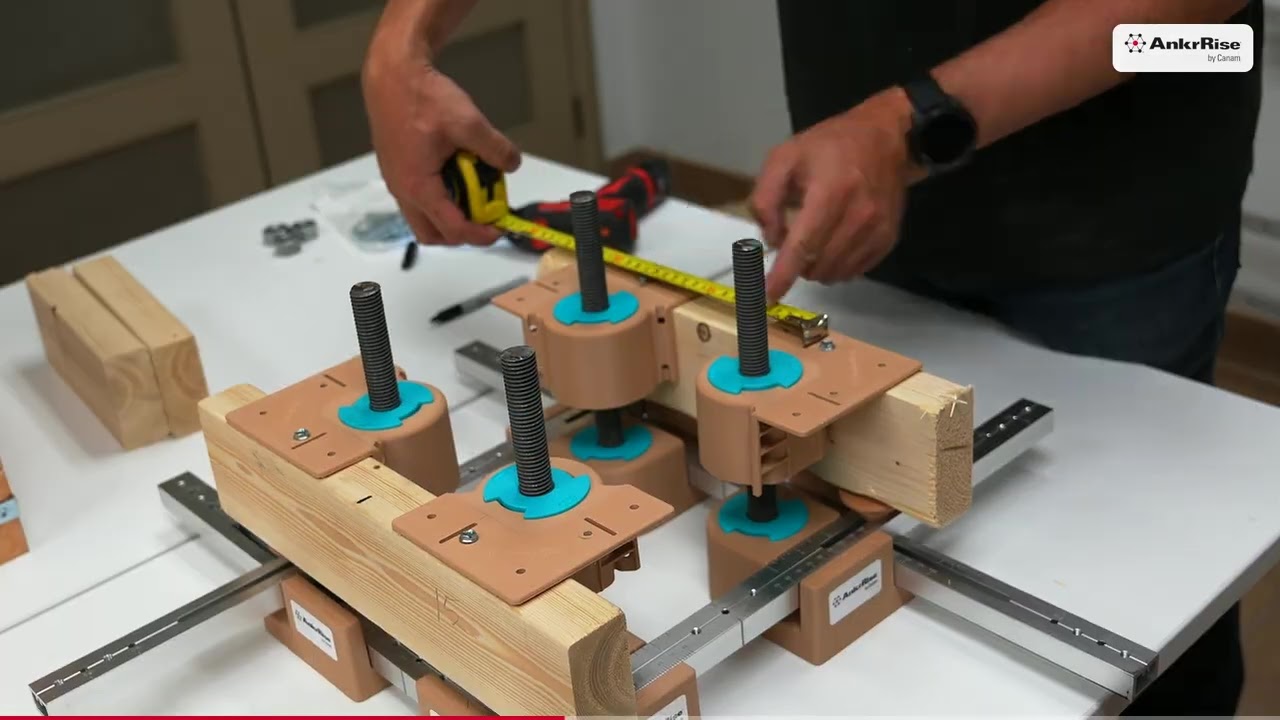
Use the AnkrRise as a master jig and reusable formwork brackets to build an exact 2x4 anchor bolt template right on site. Set it in the forms, adjust the rods and pour from the center. Here is everything, step by step. 13 steps in photos Video 1:16 Reusable brackets
OpenClose

Use the AnkrRise as a master jig and reusable formwork brackets to build an exact 2x4 anchor bolt template right on site. Set it in the forms, adjust the rods and pour from the center. Here is everything, step by step.

The whole method on video. Prefer to read? Every step is below.

What you need

  • An AnkrRise or the Starter Kit. A small (4 to 14 in) or large (4 to 27 in) AnkrRise sets the spacing. The Starter Kit includes both, plus the brackets. Shop
  • Corner formwork brackets. One per corner of the template. Shop
  • Center formwork brackets. For larger templates with center anchors, up to 8 anchors. Shop
  • Anchor rod adapters in your rod diameter, from 3/4 to 1 1/2 in. Shop
  • Assembly rods in the same diameter as your anchor rods. They line up the brackets while you build.
  • From your truck: 2x4s, wood screws, a drill, a tape measure, a level, a string line and a temporary square bracket.
Steps 1 to 7

Build the template

  1. 1

    Set the AnkrRise. Set it to the rod layout on your plans, center to center.

  2. 2

    Insert the assembly rods. Put one in the adapters of each bracket.

  3. 3

    Add the brackets and the 2x4s. Slide a corner formwork bracket onto each rod. Cut your 2x4s to the width of the formwork.

  4. 4

    Line up the center. Mark the center of each 2x4 and line it up with the bracket.

  5. 5

    Screw the bracket. Hold the 2x4 firmly and screw the bracket into it.

  6. 6

    Repeat on every side. Same thing for each 2x4 of the template.

  7. 7

    Check. Check the center-to-center distances with a tape measure. Add screws if you want it stiffer.

  8. Tip

    #8 wood screws or #10 metal screws keep concrete out of the screw heads.

Steps 8 to 10

Set it in the formwork

  1. 8

    Remove the assembly rods. The AnkrRise is free for the next template.

  2. 9

    Set it in the forms. Mark the target height inside the formwork and screw on a temporary square bracket at that height. Set the template on it and line it up with the centerlines using a string line.

  3. 10

    Fix it. Check it with a level, then screw or nail through the formwork from the outside. Remove the temporary bracket.

  4. Good to know

    One AnkrRise is enough to build as many templates as you need: once the assembly rods are out, it's ready for the next one.

Steps 11 to 13

Set the anchors and pour

  1. 11

    Insert the anchor rods. One anchor rod in each bracket.

  2. 12

    Adjust the projection. Example: the 3.5 in of the 2x4 plus the nut gives a 4 in projection.

  3. 13

    Pour, then reuse. Pour from the center, up to the bottom of the 2x4s; the space under each bracket leaves room to finish the concrete. After the pour, strip the brackets and reuse them.

  4. 2x4 or 2x3?

    For a template you pour with, use 2x4s: with a 2x3, you lose 1 in of height under the brackets to finish the concrete. 2x3s are for marking templates.

Why build it this way

  • Plumb rods

    Each bracket holds the rod over 2 in of height, so it stays straight through the whole pour.

  • Pour from the center

    The template leaves the middle of the form open for the concrete.

  • Clean threads

    The bracket shields the rod end from concrete splatter.

  • Room to finish

    There is space under each bracket to finish the concrete.

  • Reusable brackets

    Strip them after the pour and use them again, instead of cutting a new plywood template.

  • Matches your plans

    The AnkrRise sets the spacing, so every template you build is exact. You only need standard lumber.

Set anchor rods in the formwork

Screw the aluminum rails onto the formwork and pour from the center. Every rod stays plumb, exactly where the plans put it. Video 0:58
OpenClose

Screw the aluminum rails onto the formwork and pour from the center. Every rod stays plumb, exactly where the plans put it.

Watch the video 0:58

Mark drilling spots

Mark a plywood template, or chemical anchor spots on existing concrete, with a fine-point Sharpie. Video 0:41
OpenClose

Mark a plywood template, or chemical anchor spots on existing concrete, with a fine-point Sharpie.

Watch the video 0:41

Mark prebuilt formwork

Build a 2x3 template with the marking adapters, then mark or drill every anchor spot in prefabricated formwork. Video 0:49
OpenClose

Build a 2x3 template with the marking adapters, then mark or drill every anchor spot in prefabricated formwork.

Watch the video 0:49

Set anchors on structural slabs without formwork

Stand the template on galvanized U-channels cut and bent to height, then pour your slab right around it.
OpenClose

Stand the template on galvanized U-channels cut and bent to height, then pour your slab right around it.

U-channels to use: 18-gauge galvanized steel U-channels, 1/2 in x 3/4 in x 1/2 in (3/4 in web, 1/2 in legs). They slide into the ends of the precision rails and lock with the M6 wing screws.

Check existing templates

Measure and validate any template in seconds, before, during and after the pour.
OpenClose

Measure and validate any template in seconds, before, during and after the pour.

Verify your axis

Check the layout with a total station and the hands-free AnkrPrism, on the rails or on a 2x4 template. Video 0:39
OpenClose

Check the layout with a total station and the hands-free AnkrPrism, on the rails or on a 2x4 template.

Watch the video 0:39

Copy or duplicate an existing template

Set the AnkrRise on an existing template, lock in its spacing and reproduce it quickly, as often as you need.
OpenClose

Set the AnkrRise on an existing template, lock in its spacing and reproduce it quickly, as often as you need.

3 ways to use the AnkrRise

In the formwork, to build 2x4 templates and to mark: the overview in under 2 minutes. Video 1:46
OpenClose

In the formwork, to build 2x4 templates and to mark: the overview in under 2 minutes.

Understand the Starter Kit

The step-by-step guide for this technique is coming soon.
OpenClose

The step-by-step guide for this technique is coming soon.

Assemble the small AnkrRise

Brackets, rails and screws, by hand. Video 0:40
OpenClose

Brackets, rails and screws, by hand.

Assemble a large AnkrRise

The step-by-step guide for this technique is coming soon.
OpenClose

The step-by-step guide for this technique is coming soon.

The height under the top rail is 1.5 in

The step-by-step guide for this technique is coming soon.
OpenClose

The step-by-step guide for this technique is coming soon.

Rail measurements and accuracy

The AnkrRise precision rails are graduated on both sides: inches on one side, millimeters on the other.
OpenClose

The AnkrRise precision rails are graduated on both sides: inches on one side, millimeters on the other.

The reading is very precise and very easy: you read the measurement right at the mark on the installation or marking brackets.

Once you are at the right distance, tighten the assembly screws or the black handle screws to lock the rails in place.

How to use the center bracket spacer

The center bracket spacer is used with the center installation brackets and the center marking brackets. It lets you mount the bracket on a bottom rail or on a top rail.
OpenClose

The center bracket spacer is used with the center installation brackets and the center marking brackets. It lets you mount the bracket on a bottom rail or on a top rail.

On a bottom rail

  1. Set the bracket on the rail.
  2. Add the spacer.
  3. Screw it in place.

On a top rail

  1. Place the spacer under the rail.
  2. Screw the bracket in place.

Durability test

Made for the job site. Video 0:25
OpenClose

Made for the job site.

A 4,500 kg (9,900 lb) truck drives right over an AnkrRise corner formwork bracket. The result: the bracket is damaged, but still usable and ready to be reused.

  • Built to last: reusable on many templates.
  • Economical and eco-friendly: a better option than disposable wooden templates.
  • Easy to maintain: cleans up after every use.

Durable and reusable

Clean the AnkrRise and its installation brackets after the pour and use it again on the next job. If a part breaks, you can replace it.
OpenClose

The AnkrRise and its installation brackets

Clean the AnkrRise and its installation brackets after the pour and use it again on the next job. If a part breaks, you can replace it.

The formwork brackets

After the pour, unscrew the formwork brackets, remove them and reuse them on your next 2x4 template.

Assemble a marking AnkrRise

Assemble your marking AnkrRise with the precision rails, the marking brackets and the black handle screws. Assembled this way, the small AnkrRise adjusts from 4 to 14 in, center to center. Video 0:41
OpenClose

Assemble your marking AnkrRise with the precision rails, the marking brackets and the black handle screws. Assembled this way, the small AnkrRise adjusts from 4 to 14 in, center to center.

The steps

  1. Place the 4 corner marking brackets, with the pencil holes pointing diagonally toward the center.
  2. Insert the bottom rails, then the top rails.
  3. Screw in the black handle screws.
  4. Set the template to the right distances using the graduations on the precision rails. Hold the rails in place while you tighten the screws, so the measurement stays accurate.

Watch the video 0:41

Use the marking brackets

Marking brackets have pencil holes instead of rod adapters. Mounted on the small AnkrRise, they give you a marking template that adjusts from 4 to 14 in, center to center. Video 0:41
OpenClose

Marking brackets have pencil holes instead of rod adapters. Mounted on the small AnkrRise, they give you a marking template that adjusts from 4 to 14 in, center to center.

Assemble the marking AnkrRise

  1. Choose the marking brackets.
  2. Place the 4 corner marking brackets, with the pencil holes pointing diagonally toward the center.
  3. Insert the bottom rails, then the top rails.
  4. Secure the template with the black handle screws. Hold the rails in place while you tighten the screws, so the measurement stays accurate.

Mark

  1. Place the template, set to the right dimensions, on the plywood.
  2. Mark the drilling spots with a Sharpie.
  3. Drill the holes, then install your anchor bolts in the formwork.

Marking brackets also work directly on concrete.

Watch the video 0:41

Use the marking adapters

Marking adapters replace the rod adapters in the formwork brackets. They are a little thicker and made for a Sharpie: you mark exactly where to drill. Video 0:49
OpenClose

Marking adapters replace the rod adapters in the formwork brackets. They are a little thicker and made for a Sharpie: you mark exactly where to drill.

How it works

  1. Set the AnkrRise to your anchor spacing, with the assembly rods in place.
  2. Build a 2x3 frame with the formwork brackets: one piece of wood and one corner at a time, holding the corners firmly.
  3. Pull out the rods and lift the frame off the AnkrRise.
  4. Mark the center lines on the frame, on each side, with a tape measure.
  5. Swap the rod adapters for the marking adapters, from underneath.
  6. Set the frame on the 2x4s in the formwork and line up the center lines, with a tape measure or a string line.
  7. Mark each drilling spot with the Sharpie, right through the marking adapters.
  8. Lift the frame off and drill the holes with the right bit for your anchors.

Why 2x3s? The marking adapters sit flush with the bottom of a 2x3. That's why this setup uses 2x3s, not 2x4s.

Watch the video 0:49

Marking for chemical anchors

You can use a small AnkrRise template with the aluminum rails, assembled with the marking brackets. Set it to the right dimensions, then mark with a Sharpie or drill your chemical anchors right on the concrete.
OpenClose

You can use a small AnkrRise template with the aluminum rails, assembled with the marking brackets. Set it to the right dimensions, then mark with a Sharpie or drill your chemical anchors right on the concrete.

If, for one reason or another, you are short on space, you can build a small 2x3 template and insert the marking adapters. Then set it on the concrete and mark your locations with a Sharpie, or drill.

Which screws should you use for the formwork brackets?

The formwork brackets were developed for #8 wood screws, but we recommend #10 hex-head sheet metal screws.
OpenClose

The formwork brackets were developed for #8 wood screws, but we recommend #10 hex-head sheet metal screws, like the one shown below.

With concrete and splatter, a hex-head screw is easier to remove than a square-drive screw, where concrete can pack into the screw head. #10 sheet metal screws work great with our formwork brackets.

Recommended screw

  • Type: self-tapping sheet metal screw
  • Size: #10
  • Length: 1 1/2 in
  • Head: hex washer head, slotted
  • Material: zinc-plated steel

Finish the concrete with the 2x4 template in place

Use a pointed trowel: it lets you finish the concrete under the formwork bracket. You have more than 1 in of clearance to get in there.
OpenClose

Use a pointed trowel: it lets you finish the concrete under the formwork bracket. You have more than 1 in of clearance to get in there.

It's fairly easy when the template is large enough. If you have a small template, think about using a 2x3 on each side: you can then finish the concrete from outside the template.

Change the angle of an anchor rod when it's blocked by rebar

When an anchor rod is blocked by rebar in the formwork, you can simply remove one adapter, the bottom one. This helps you shift the rod so it fits in the formwork.
OpenClose

When an anchor rod is blocked by rebar in the formwork, you can simply remove one adapter, the bottom one. This helps you shift the rod so it fits in the formwork.

The angle of the rod will change, but in some cases you have no choice.

Ideally, with the engineer's approval, the rebar should be cut and re-tied at the bottom, or moved if possible, so you keep both adapters and the rod stays plumb.

Back to articles
FAQ

Frequently asked questions

Answers to the questions we hear most often.

What anchor spacing can the AnkrRise handle?

From 4 to 14 in center-to-center with the small rails, and from 4 to 27 in with the large rails. The Starter Kit includes both.

How many anchors can I set at once?

Up to 8 with the large AnkrRise, using corner and center installation brackets. The small AnkrRise ships with 4 corner brackets, for 4 anchors.

Which rod diameters are supported?

Seven diameters: 3/4, 7/8, 1, 1 1/8, 1 1/4, 1 3/8 and 1 1/2 in. Each diameter has its own color-coded adapter. Each installation bracket takes two adapters, one at the top and one at the bottom, to hold the rod perfectly straight. The same goes for the formwork brackets: whether it's a center or a corner bracket, you need two adapters to hold the anchor rod, one at the top and one at the bottom.

Are adapters included?

With the Starter Kit, yes: 96 adapters and 8 assembly rods in the diameter you choose. With the small or large AnkrRise, no: order anchor rod adapters (tube of 16) separately.

Do I need tools to assemble it?

No. The AnkrRise assembles by hand. You only need a drill to screw formwork brackets to your 2x4s or to fix the AnkrRise in the forms.

Can I use 2x3s instead of 2x4s?

It depends on the job.

For a template you pour with

  • Option 1: 2x4s. This is the recommended choice: you keep the full height under the brackets to finish the concrete. When the template is large, a full 2x4 template does the job. With 2x4s, the minimum projection is 4 in.
  • Option 2: 2x4s and 2x3s. In some cases, the 2x4s are lined up with the formwork and 2x3s are used in the small templates, so you can get a trowel underneath to finish the concrete. Useful when the template is small.
  • Option 3: 2x3s only. This also works, but you lose 1 in of height under the brackets to finish the concrete.

For a marking template

  • Only one option: 2x3s. You must use 2x3s with the marking adapters: they are designed to sit flush with a 2x3. This lets you get into the tightest formwork to mark the locations or set your anchors.
Is it really reusable?

Yes.

The AnkrRise and its installation brackets

Clean the AnkrRise and its installation brackets after the pour and use it again on the next job. If a part breaks, you can replace it.

The formwork brackets

After the pour, unscrew the formwork brackets, remove them and reuse them on your next 2x4 template.

Can I check my layout with a total station?

Yes. The holes at the center of the rails take the prism. The AnkrPrism mounts there so you don't need to hold it. You can also drill a hole at the center of your templates, whether plywood or 2x4. Just use a 3/16 in drill bit, and the prism fits perfectly.

Back to articles